Step 1:
Well, you have saved out your tga into your own personal working folder in Part 1 and now we are ready to start working in 3D. So open up your 3D software of choice and I will walk you through the basic setup for creating a simple 3D model to apply our cargo container texture too ( * depending on the 3D software you use, some of the things that I explain may not be exactly the same, but they should be relatively close ).
Step 2:
Once you have your software open, I need you to Create > Primitive Polygon > Cube with the following settings (I scaled the polygon cube in the z axis because most cargo containers are not square and moved it up in the y axis so it is sitting on the ground plane X: 0 Y: 0 Z: 0.
Step 3:
With the following settings scale the polygon cube in the z axis because most cargo containers are not square and moved it up in the y axis so it is sitting on the ground plane X: 0 Y: 0 Z: 0.
Step 4:
Now we need to split the front face of the polygon for the cargo container doors. Go to Edit Polygons > Split PolygonsTool ( * remember some tools may be different depending on the software you are using) and split the polygon cube down the middle.
Step 5:
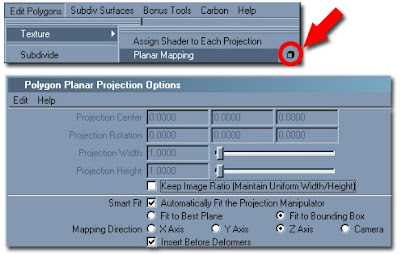
We now need to set up our poly cube’s UV’s (before any polygonal object can be textured, it must have UV information on the surface so that the texture has information to “stick” too. No UV’s = not texture “adhesion” ---in layman terms) to be ready for us to apply the cargo container texture to it. First we select the cargo container doors in face mode (this is a mode that lets you select the polygon object by its component type, in this case we want to select the face component). Once the face is selected, go to EditPolygons > Texture > Planar Mapping []. Depending on which face you have selected, this will determine in which direction you will apply the planar map too. For this case, we selected the face that we split down the middle and projected a planar map down the z axis.
Step 6:
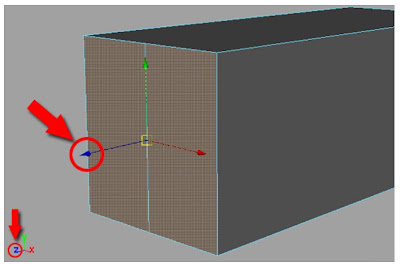
A good way to know which axis you are going to apply a planar map too, is to look at the face when you have it selected and with the move tool selected look at the color of the handles. That color of the handles will represent the direction that particular face is pointing
Step 7:
After applying the planar mapping to all the faces of your cargo container, open up Window > UV Texture Editor and you should have something that looks like this.
Step 8:
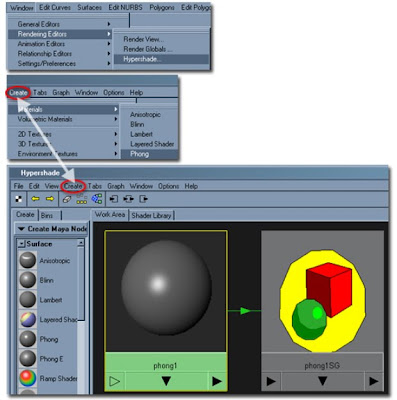
Now with the UV’s finished we can now apply the texture that we created to our cargo container. So I need you to open up your material editor, Window > Rendering Editors > Hypershade. Once in the Hypershade, I will have you create a material with a little reflectivity. So in this case, go to
Create > Materials > Phong.
Step 9:
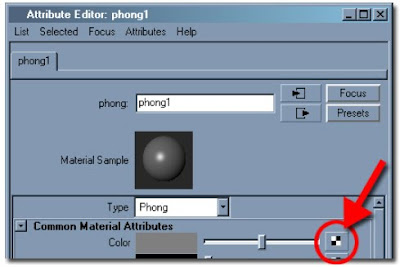
Double click on the Phong that you created to bring up the Attribute Editor of that material. With the Attribute Editor open, click on the create render node for the Color Material Attribute.
Step 10:
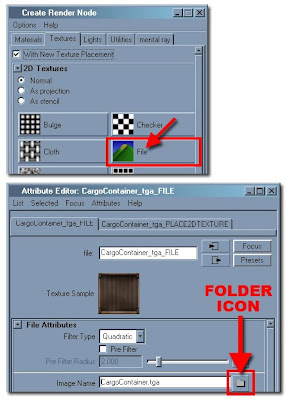
In the Create Render Node of the material we need to add a file to the Phong that we created. Select File and this will bring up the Attribute Editor to add the texture that you created to the material. Select the folder icon next to the Image Name and point to the file you created in your working folder.
Step 11:
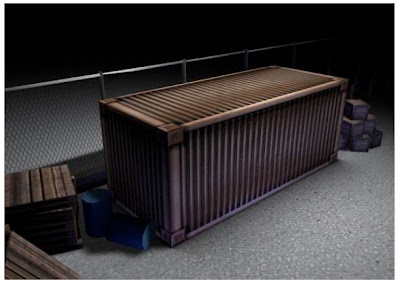
After the texture is loaded onto the Phong, apply that material to your Cargo Container polygon. You can do this by holding down on your MMB (Middle Mouse Button) and dragging the Phong material onto your polygon.
Step 12:
Well, that is the basic tutorial on how to create a 2D texture in Photoshop and bring it into a 3D application and make it come to life. So feel free to play around with your 3D application and add some additional touches to it…..Don’t be scared, you will not break anything.
No comments:
Post a Comment